GNU Octave is a very powerful suite for its numerical, graphical, and programming capabilities. Despite being open-source this software suit can completely replace MATLAB (except few use cases). The simplest method for using the Octave is interactive; an expression is entered by the user and GNU Octave immediately responds with a result. It is also possible to write programs similar to MATLAB. Such programs are basically groups of commands that are executed in a sequential manner.
The intended audience of this article is the first time users as well as occasional users who are planning to use Octave to the full extent. This article focuses on the basics of the GNU Octave environment. We encourage readers with the intention to learn octave to execute and test the tasks marked as “Ex:” in the article for better understanding.
Invoking GNU Octave
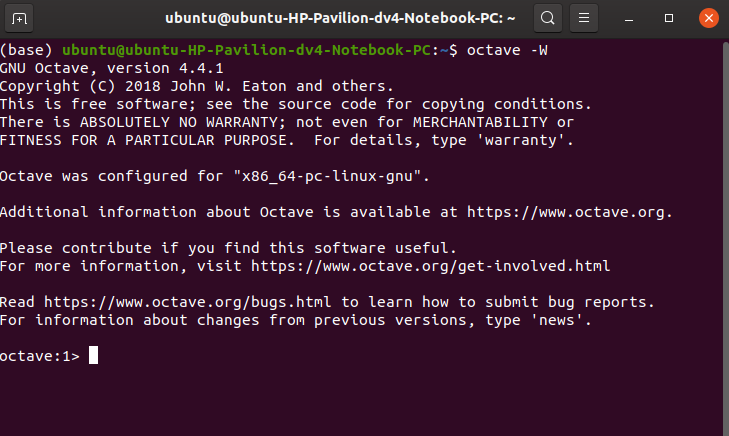
Normally, Octave is used interactively by running the program ‘octave’ without any arguments in the command line or directly clicking on the application icon in the desktop environment. One can also specify the name of a file on the command line or start a file with “Open with” drop-down menu and selecting “Octave” as application. Octave will read and execute the commands from the named file and then exit when it is finished. When started via command-line many control options can be used to control the behavior of Octave. For example, when called with the “-W” argument the octave environment is forced to the terminal only and no graphical user interface is shown. Such control is useful when executing a large script with higher complexity as the overhead of graphics is simply removed.
Ex: Type ‘octave --help’ to display all available options and briefly describe their use (‘octave -h’ is a shorter equivalent).
Octave environment
When started in a non-graphical environment prompt is shown as:
Octave:1>In the prompt numeric is the command number or line number, which will increment after every command entered. In this case, the output is directly displayed at the terminal. Commands for both graphical and non-graphical environments are the same, so we will focus on the graphical environment due to increased accessibility.
In graphical mode, the main part is the Command Window with prompt
>>Typing any command in this window is the same as typing any command on octave prompt of non-graphical terminal only environment. The command window is interactive. Any command or expression can be entered after prompt, and Octave will immediately respond with the result. To quit the octave environment, the user can either type “quit” or “exit” on the prompt or simply close the window using menus.
Ex: Open terminal only Octave environment with "octave -W" and exit using different methods.
Ex: Open Octave with "octave" and exit using different options available.
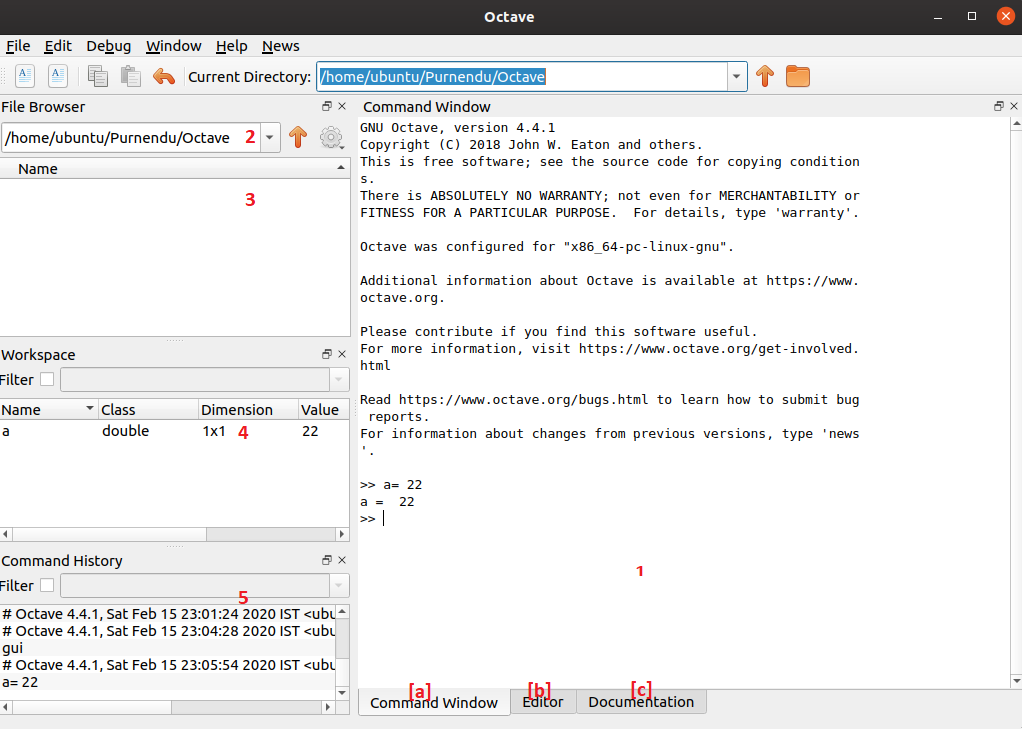
Graphical Window arrangement (Default)
- The main command window [a] (biggest window in the graphical environment) is stacked over the Editor window [b] as well as the documentation window [c]. Multiple commands can be entered in the editor window together and can be saved as a script to run at once. Commands in the script are run sequentially. The third tabbed window “Documentation” is quite useful to easily get information about functions, commands, as well as Octave itself. Along with Command Window, there are several other windows that can be opened and may be opened by default.
- Above the Command Window, there is a pull-down menu for the Current Directory. The folder that is set as the Current Directory is where files will be saved. This is also the Work Directory.
- On the left there are three smaller windows arranged one over other. At the top, there is a File browser which is very useful to locate files to be used in the ongoing tasks as well as setting current directory.
- Below the file browser there lies the Workspace window. All stored variables with properties and values are displayed in this window.
- The command history window is at the bottom left. This Window shows commands that have been entered, not just in the current session, but previously as well.
By default all windows are open and these can be closed separately as well as resized as per user requirement. To manage window layout and look at shortcuts for the same check the “Window” menu at the top.
Ex: Set different window configurations with UI as well as shortcut. Getting familier with shortcut is very necessary to increase the working efficiency when working on large projects.
Self-help
The following are the few commands that can serve as an introduction to Octave and a good starting point.
- “info” command can be used to get information on the software package.
- “ver” command can be used to get the version of Octave being used.
- “help” command can be used to get help. This command can be used with arguments for getting help on specific commands e.g. “help sin”.
- “demo” command has demos for several options. If the demo for that option is not available a warning is returned.
- “lookfor” command searches through the help for a specific string. This is pretty helpful when you have forgotten or want to find very specific commends. Although this can take a very long time.
- “doc” command changes active window to documentation for manual search and reference.
Ex: Check above commands with different possible arguments and try to get a valid output rather then error or warning.
This article should serve as the first step towards harnessing the power of GNU Octave. Please write down any queries or suggestions related to the article as a comment.
- GNU Octave – Scientific Programming Language
- Octave:1> Getting Started
- Octave:1> Variables and Constants
- Octave:1> Expressions and operators
- Octave:1> Built-In Functions, Commands, and Package
- Octave:2> Vectors and Matrices Basics
- Octave:2> Scripts and Algorithm
- Octave:2> Conditional Execution
- Octave:2> Functions
- Octave:3> File Operations
- Octave:3> Data Visualization